A 2500-word SEO outline focused on how distributor buyers can evaluate seam strength, stitch durability, and production quality for bulk embroidered jacket...
Embroidered Jacket Patch Seam Review for Buyers - Fabrikn production reference
For distributor buyers, embroidered jacket patches are not just decoration. They are a wear point, a return risk, and a brand presentation issue. A patch may look sharp in a product photo, but if the seam lifts after a few wears, pulls at the corners, puckers after washing, or cracks the coating on the jacket shell, the order becomes a customer service problem.
Bulk embroidered jacket patch seam strength review is especially important when jackets are sold into teamwear, workwear, school merchandise, outdoor promotional programs, and retail private label channels. These products are handled more aggressively than many buyers expect. Jackets are folded tightly, packed in cartons, steamed, worn over layers, pulled at the chest, rubbed by backpacks, and washed under conditions that may not match the care label. The patch seam has to survive more than a showroom inspection.
The practical review starts with one question: is the patch attachment method suitable for the jacket fabric, patch size, end use, and price point? If the answer is unclear, the buyer should slow down before approving bulk production. A weak patch seam can rarely be fixed after the order is finished. Re-stitching thousands of jackets creates needle damage, visible repair marks, mismatched thread tension, and delivery delays.
This guide focuses on the buying side: what to request, what to check, what to approve, and where the main tradeoffs sit. It is written for distributor buyers managing bulk orders, not for hobby embroidery or one-off customization. For buyers comparing decoration options across apparel programs, Fabrikn’s broader apparel manufacturing and decoration capabilities can be reviewed through its services page.
Patch seam strength should be considered before the quotation is locked, not after the purchase order is placed. The quote stage is when buyers still have leverage to adjust patch size, placement, stitching method, packaging requirements, testing scope, and approved tolerance standards.
A distributor buyer should review the following items before confirming pricing:
The most common mistake is treating the embroidered patch as a separate trim item. In production, the patch, jacket shell, lining, padding, and sewing process behave as one system. A thick merrow-border patch may sit well on a cotton twill coach jacket but create poor edge contact on a slick nylon bomber. A dense chenille-style patch may be acceptable on a varsity jacket but too heavy for a lightweight windbreaker sleeve.
Distributors also need to consider customer expectations. A corporate promotional jacket may be worn only occasionally, while a uniform jacket may be worn daily. A retail buyer may reject minor puckering that a workwear buyer would accept if durability is strong. The sourcing decision should match the sales channel rather than a generic decoration standard.
A strong patch seam is not simply a tight stitch. It is a balanced attachment that holds the patch securely without damaging the jacket shell or distorting the garment.
Different patch constructions create different seam strength risks. Buyers should ask the supplier to identify the patch type in the technical file and should not rely only on artwork approval.
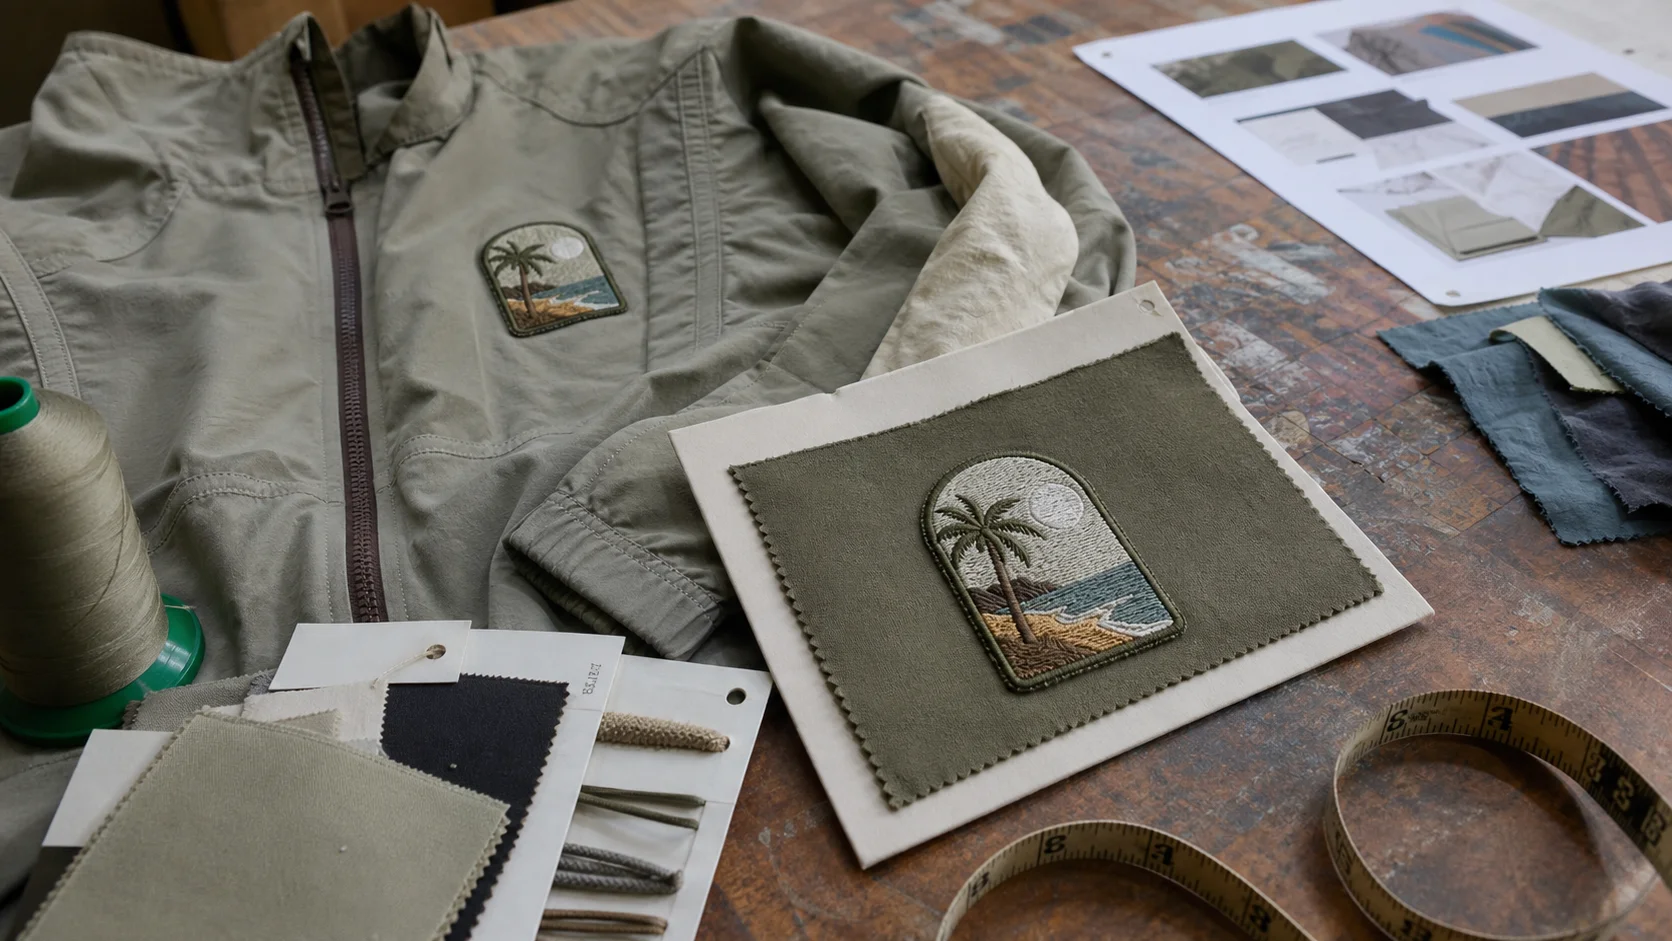
Flat embroidered patches are widely used for logos, badges, team names, and promotional branding. They usually have a twill base with embroidery thread stitched over the top. The edge may be satin stitched, laser cut, heat cut, or merrowed.
For bulk jacket orders, flat patches are usually the safest option when the logo allows it. They offer good flexibility, manageable weight, and predictable sewing performance. Seam strength depends on edge construction and stitch placement. If the border is too narrow, the sewing line may miss the patch base or sit too close to the edge, causing fraying or lifting.
Merrowed patches have a raised overlocked edge. They are common on uniforms, outdoor clubs, schools, and heritage-style jackets. They look durable, but the raised edge can make attachment less stable on curved areas.
When sewing merrow-border patches onto jackets, the stitch line usually sits just inside the raised border or catches part of the border depending on the design. If the patch is thick and the jacket shell is slippery, the patch may shift during sewing. Buyers should request a bulk sample or pilot run if the patch is large, circular, or placed on a sleeve.
Heat-seal patches include adhesive backing and may be pressed onto the jacket before or instead of sewing. For distributor bulk orders, adhesive alone is a risky choice unless the jacket fabric, coating, heat tolerance, and end-use have been validated.
Many jacket shells use water-repellent coatings, PU coatings, laminates, or textured finishes. Adhesive bonding can fail on these surfaces, especially after flexing or washing. Heat application can also leave shine marks, scorch marks, coating bubbles, or flattened insulation. A safer approach is often heat-tack plus perimeter stitching, but the supplier must confirm the fabric can tolerate press temperature and dwell time.
Chenille, felt, and layered patches are common on varsity jackets and fashion outerwear. They are heavier and thicker than standard embroidered patches. Seam strength depends not only on the stitching but also on whether the jacket panel can support the patch weight.
Large chenille patches on thin nylon shells are a poor match unless the design is intentionally decorative with limited durability expectations. On wool-blend varsity bodies, felt applique or chenille patches can perform well when stitched with correct thread tension and stable backing.
Some logos use woven detail for small text and embroidery for raised areas. These combination patches can be useful when artwork requires fine detail, but their edges and backing must be reviewed carefully. Thin woven sections may curl if not secured properly. Dense embroidered sections may cause uneven stiffness across the patch.
The jacket fabric is usually the deciding factor in patch seam strength. A patch that works on fleece may fail on a coated nylon shell. A patch that looks clean on canvas may pucker badly on satin. Buyers should require physical fabric and patch compatibility testing before approving large bulk orders.
Jacket Fabric Patch Seam Risk Buyer Recommendation Nylon taffeta or polyester shell Slippage, puckering, needle holes, coating damage Use fine needle, controlled tension, and test heat carefully if adhesive is used. Softshell fabric Bulk at seam, adhesive failure on treated surface Review needle penetration, waterproof membrane risk, and patch flexibility. Cotton twill or canvas Fraying at patch edge, shrinkage mismatch Good candidate for sewn patches; confirm wash shrinkage and border coverage. Fleece Patch edge tunneling, pile trapped in seam Use stable backing and inspect edge coverage after brushing and wash testing. Wool-blend varsity fabric Distortion under heavy patches Suitable for chenille and felt when panel is stable and stitching is balanced. Quilted or padded jacket panels Uneven stitch bite, insulation compression Test bulk sewing; consider patch placement before quilting or use reinforced panel.Patch placement also changes seam strength. Chest placement is usually manageable because the panel is flat and accessible. Sleeve placement is more difficult because of curvature, narrow sewing space, and movement during wear. Shoulder placement is risky because of high stress from arm movement and backpack straps. Back patches can be strong if the panel is stable, but large patches may create stiffness and bubbling.
For lined jackets, the supplier must clarify whether the patch is attached before lining assembly or after the jacket is complete. Sewing through the outer shell only gives a cleaner interior, but it requires correct production sequencing. Sewing through the finished jacket can catch the lining and create visible interior stitching. That may be acceptable for some workwear programs but not for retail outerwear.
Patch seam construction is where buyers should be direct. A vague note such as “sewn patch” is not enough for bulk production. The technical package should define how the patch is attached, where the stitch line sits, and what defects are unacceptable.
Single-needle lockstitch is one of the most common methods for attaching embroidered patches. It offers a clean appearance and good control around curves. For many distributor orders, this is the most practical choice.
Typical stitch density may fall around 8 to 12 stitches per inch, depending on fabric, patch thickness, and desired appearance. Too few stitches can allow edge lifting. Too many stitches can perforate lightweight shells and create a tear line. Buyers should not request the highest stitch count by default. The right stitch density is the one that secures the patch without weakening the base fabric.
Zigzag stitching can be useful for applique-style patches or patches without a heavy finished border. It can cover the edge and reduce fraying. The tradeoff is appearance. Zigzag attachment may look more casual or athletic than a clean perimeter lockstitch.
On stretchy or textured fabrics, zigzag may help accommodate movement. On slick shell fabrics, it can create more visible puckering if tension is not controlled. Buyers should approve the stitch appearance on the actual jacket fabric, not only on a flat test swatch.
Double stitching can increase security for large patches or high-use garments. It also increases production time, needle holes, and visual bulk. A double-stitch row may be useful for workwear, uniforms, or outdoor club jackets, but it can look too heavy for fashion or corporate outerwear.
The second row should be planned. Random reinforcement after seam failure is not a good production method. If double stitching is required, specify spacing, thread color, and whether both rows must follow the same shape consistently.
Some rectangular or shield-shaped patches benefit from discreet reinforcement at corners. Bar tacks can reduce lifting where users tend to catch the edge. The downside is visibility. On premium retail jackets, visible bar tacks may be unacceptable unless integrated into the design.
Adhesive can help hold a patch in place during sewing and may improve flatness, but it should not be treated as a substitute for good stitching in most bulk jacket programs. Heat and adhesive must be tested against the jacket shell. Buyers should ask for press temperature, dwell time, pressure, and peel performance after washing or flexing.
Patch seam strength depends on materials that are easy to overlook. Thread type, backing stiffness, border width, and trim quality can determine whether the attachment holds in real use.
Polyester thread is commonly preferred for jacket patch attachment because it offers good strength, abrasion resistance, and wash performance. Cotton thread may be used for certain heritage looks, but it is less common for performance-driven bulk outerwear. Nylon thread can be strong, but heat sensitivity and colorfastness should be reviewed.
Thread color should be specified clearly. Tonal thread hides minor stitching variation. Contrast thread can look intentional but exposes every wobble around curves. For distributor buyers managing broad size or color assortments, tonal thread is usually safer unless contrast stitching is part of the design.
The embroidery thread on the patch should be colorfast, consistent, and suitable for the intended wash method. Rayon embroidery thread has a bright appearance but may be less durable under harsh laundering than polyester. Polyester embroidery thread is often a safer choice for uniforms, teamwear, and promotional jackets likely to be washed repeatedly.
Patch backing affects stiffness and edge behavior. A backing that is too soft may curl. A backing that is too stiff may resist the shape of the jacket panel and cause edge lifting. For curved sleeve placements, flexibility matters. For flat chest badges, a slightly firmer backing may help maintain shape.
The border must give the sewing line enough room. If the artwork pushes text or fine detail too close to the edge, the factory may either sew into the design or stitch too close to the patch edge. Both outcomes are risky.
As a practical rule, distributor buyers should request a visible sewing margin in the patch design. The exact margin depends on patch type and size, but the supplier should not be forced to sew on a narrow or unstable edge. For small patches with fine text, consider a woven patch or simplified artwork rather than squeezing embroidery into an unsuitable shape.
Needle size and point type matter. Lightweight shell fabrics can show needle damage quickly. Heavy patches may require a stronger needle, but larger needles create larger holes. The supplier should balance penetration strength with fabric protection. If the jacket has a membrane or coating, needle holes may affect water resistance. Buyers selling water-resistant jackets should be careful about adding patches in areas where waterproof performance is part of the selling claim.
Distributor buyers do not always need laboratory testing for every patch order, but they do need a repeatable review method. The higher the order value, end-use risk, and customer sensitivity, the more formal the testing should be.
A basic seam strength review starts with visual inspection and a controlled manual pull. The inspector should look for skipped stitches, loose bobbin thread, uneven tension, puckering, broken thread, fabric distortion, and areas where the patch edge can be lifted easily.
A manual pull should be consistent. Pulling aggressively until something fails is not a useful QC method unless the goal is destructive testing on retained samples. The better approach is to apply moderate force at the patch edge and corners, then check whether the seam opens, stitches loosen, or the jacket fabric tears.
Wash testing is important for jackets that are marketed as washable. A patch may pass initial inspection but fail after the first wash due to shrinkage mismatch, adhesive softening, thread movement, or fabric puckering.
At minimum, buyers should review the patch after one wash cycle that matches the care label. For higher-risk orders, review after three to five cycles. Tumble drying should be tested only if the care label permits it. If the jacket is dry clean only, the patch materials and adhesive must be suitable for that care method.
Jacket patches face abrasion from arms, bags, seat backs, and folding. Sleeve patches and shoulder patches deserve extra attention. A simple flex review can reveal whether the edge lifts when the garment bends. For workwear or uniform programs, a more formal abrasion test may be justified.
If adhesive is used, peel resistance should be checked before and after wash or flex testing. Adhesive failure often starts at a corner. Once an end user can catch the lifted corner with a finger, the patch will usually deteriorate quickly.
Patch seam strength is not only about whether the patch stays attached. A seam that causes the jacket panel to pucker or twist may still be commercially unacceptable. Buyers should check patch alignment, panel flatness, edge smoothness, and garment symmetry after attachment.
A clear sample approval workflow reduces risk. It also prevents the supplier from interpreting artwork approval as production approval. Distributor buyers should separate artwork approval, patch approval, placement approval, and bulk production approval.
The pre-production sample should use bulk-intended materials. A patch sewn onto substitute fabric does not prove bulk performance. A sample made with a different backing, thread, adhesive, or stitch density is also not a reliable reference.
Buyers should request photos, but photos alone are not enough for high-risk orders. A physical sample allows the buyer or customer to feel stiffness, check edge lift, bend the panel, and review the interior finish. If timing does not allow physical sample approval, the buyer should recognize the added risk and document acceptable tolerances clearly.
For support in evaluating manufacturing steps or discussing a new bulk apparel program, buyers can contact Fabrikn through the contact page.
MOQ and lead time for embroidered jacket patch orders vary by jacket style, patch complexity, material availability, decoration method, and inspection requirements. Buyers should avoid assuming that patch decoration is a small add-on with no production impact.
For distributor bulk programs, practical MOQ ranges often depend on whether jackets are stock blanks or custom manufactured garments.
Order Type Typical MOQ Range Notes for Buyers Stock jacket with sewn patch decoration 100 to 300 pieces Lower MOQ may be possible, but unit decoration cost is higher. Custom jacket with standard embroidered patch 300 to 800 pieces MOQ depends on fabric sourcing, colorways, and size spread. Custom jacket with complex patch or multiple placements 500 to 1,500 pieces More sampling and inline QC are usually needed. Retail private label outerwear program 800 to 2,000 pieces or more Packaging, labeling, and testing requirements may drive MOQ upward.These are general commercial ranges, not fixed rules. Some suppliers accept smaller orders with surcharges. Others require higher minimums because of fabric dyeing, patch production setup, or line efficiency. Distributor buyers should ask which part of the order drives the MOQ: jacket body, patch, embroidery thread, backing, labels, packaging, or finishing.
Lead time is affected by several linked steps. Patch artwork digitizing, thread color matching, strike-off approval, jacket fabric booking, cutting, sewing, patch attachment, washing or finishing, inspection, packing, and logistics all add time. A delay in patch approval can hold the whole order if the patch must be attached before lining or final assembly.
For stock jacket decoration, a practical lead time may be shorter, often a few weeks after sample approval depending on quantity and capacity. For custom jackets with patches, buyers should plan a longer calendar. Sampling alone can take time when artwork revisions, patch stiffness, or placement changes are required.
Urgent orders create tradeoffs. A supplier may skip proper wash testing, reduce sampling rounds, or move decoration after garment completion to save time. That can be acceptable for simple promotional use, but it is risky for uniforms, retail programs, or jackets with performance claims.
Patch seam strength is tied to cost in practical ways. A stronger or cleaner attachment often requires more labor, better setup, slower sewing, and more inspection. Buyers should expect cost changes when requesting large patches, complex shapes, thick borders, double stitching, exact placement tolerance, or post-wash testing.
The lowest quote is not always the best buy. If a cheaper supplier reduces stitch density, uses weak backing, skips sampling, or attaches patches after lining without clean interior control, the apparent savings can disappear quickly through returns and rework.
Inspection for embroidered jacket patch seams should be specific. Generic AQL inspection can miss decoration problems if the checklist does not call them out. The inspector should know what counts as a major defect, minor defect, or acceptable production variation.
Patch placement tolerance should be realistic. A tolerance of plus or minus 3 mm may be difficult on padded or curved panels. A tolerance of plus or minus 5 mm is more common for many bulk jacket programs, though retail or uniform customers may require tighter control. Buyers should define the measurement point clearly, such as distance from center front zipper, shoulder seam, pocket edge, or sleeve hem.
The size range matters. A patch that looks balanced on a size medium may look too high, too low, or too large on extra small or 3XL. For broad size runs, approve placement on more than one size. Grading rules for patch placement should be stated before bulk cutting or decoration begins.
Inline inspection is valuable because patch seam problems can be corrected before thousands of units are finished. Review the first production pieces after patch attachment. Check whether operators are maintaining stitch line, tension, and placement. If the first 50 pieces show edge lift or puckering, the process needs adjustment before full output continues.
Final inspection should include both appearance and handling. Inspectors should gently lift patch edges, bend the panel, check thread security, review the inside construction, and compare placement against the approved sample. Packed goods should also be checked because tight folding can stress raised patches and create crease marks.
Large or thick patches can be damaged during packing. If patches are folded sharply, the edge may lift or the embroidery may crush. Buyers should review folding method, carton height, polybag size, and whether tissue or protective sheets are needed for premium jackets. Better packing increases cost but can protect the decoration during transit.
A distributor buyer needs clear decision rules. Not every minor variation should stop production, but seam weakness should not be ignored. The main question is whether the defect affects durability, appearance, resale value, or customer acceptance.
The best buying decision is not always the strongest possible attachment. For example, double stitching a lightweight fashion jacket may create more damage and visual bulk than benefit. Heat-sealing a patch to save labor may be unacceptable on a coated shell. A large sleeve patch may look attractive in artwork but fail in wear because of arm movement and fabric curvature. Buyers should judge the complete commercial outcome.
When risk is high, reduce variables. Use a simpler patch shape, choose tonal thread, move placement to a flatter panel, reduce embroidery density, or approve a more flexible backing. These changes may be less dramatic visually, but they usually improve production consistency.
Distributor buyers often sit between the end customer and the manufacturer. That position creates pressure: the customer wants a strong visual result, while the supplier needs practical specifications. The buyer’s role is to turn expectations into measurable requirements.
Start with the artwork, but do not let artwork dominate the technical decision. Logos with tiny text, sharp points, narrow outlines, and large dense fill areas can create difficult patches. If the jacket fabric is thin or slick, technical simplification may protect the final product. It is better to explain this early than to defend a failed patch later.
Ask the supplier for a decoration breakdown in the quote. The breakdown should identify patch type, attachment method, expected sampling time, and any material limitations. If the supplier only quotes “embroidered patch” without detail, request clarification before issuing a purchase order.
Use approved samples as contractual references. Keep one sample with the buyer, one with the supplier, and one if needed with the customer or inspection team. Photos should document front view, close edge view, reverse side, and placement measurements. These references help reduce arguments during final inspection.
For larger programs, consider a pilot production quantity before full bulk. A pilot run of 30 to 100 pieces can reveal issues that a single sample misses, such as operator consistency, placement variation, tension drift, and packing effects. Pilot production adds time and cost, but it may prevent a larger failure.
Distributors developing recurring programs should also document lessons from each order. If a certain patch backing works well on polyester softshell, record it. If a sleeve placement caused excessive rejects, record that too. Repeat orders become more profitable when decoration specifications are standardized.
A clear specification sheet protects both buyer and supplier. It does not need to be complicated, but it should include enough detail to prevent guesswork.
Specification Item What to Define Why It Matters Patch size and shape Width, height, shape, and approved artwork file Controls placement, edge sewing, and visual balance. Patch base fabric Twill, felt, woven base, or other material Affects flexibility and edge stability. Embroidery thread Polyester or rayon, color references, finish Controls durability and color consistency. Patch backing Cut-away, heat-seal, plastic, paper, or other backing Affects stiffness, curling, and wash behavior. Border type Merrow, satin, laser cut, heat cut, or folded edge Determines where the sewing line can sit. Attachment stitch Lockstitch, zigzag, double row, or other method Directly affects seam strength and appearance. Thread for attachment Fiber type, size if known, color, and finish Prevents weak or visually inconsistent sewing. Placement Measurement points, tolerance, and size grading rules Reduces misalignment and size-range disputes. Testing Wash, flex, pull, peel, or abrasion requirements Confirms suitability before bulk release. Inspection criteria Major and minor defects with approved sample reference Supports fair and consistent quality decisions.If a supplier cannot confirm these points, the buyer should treat the order as higher risk. That does not mean the supplier is unsuitable, but it means the buyer needs more samples, clearer tolerances, or a simpler design.
Within the Decoration & Printing category, embroidered patches sit between branding, trim, and garment construction. They are more durable than many surface prints when executed correctly, but they are less flexible and can be more expensive. Buyers should compare them against direct embroidery, screen printing, heat transfer, woven labels, and applique based on the jacket fabric and sales channel.
Direct embroidery can be cleaner for small logos, but it may damage thin shells or penetrate waterproof layers. Screen printing can be lighter and cheaper for large graphics, but it may crack or fade depending on ink and fabric. Heat transfer can handle detail and gradients, but adhesion on treated outerwear fabrics must be tested. Embroidered patches are useful when buyers need a dimensional, premium, or uniform-style look with replaceable or pre-made branding.
The main tradeoff is flexibility versus perceived value. A patch can make a jacket look more substantial, but it also adds stiffness. On a structured work jacket, that may be positive. On a lightweight packable shell, it may feel clumsy. Buyers should not use patches simply because they appear premium in isolation. The decoration must match the garment.
For background on manufacturing approach and company positioning, buyers can review Fabrikn’s about page.
Bulk embroidered jacket patch seam strength review should be part of the buying process from the first quote. The buyer should not wait until final inspection to discover that the patch is too stiff, the seam is weak, or the jacket fabric cannot handle the attachment method.
Use actual materials for approval. Define the patch type, border, backing, attachment stitch, placement, and inspection criteria. Test according to the jacket’s real end use. Be cautious with heat seal on coated shells, large patches on curved panels, and dense embroidery on lightweight fabrics. Pay attention to packing, because a good patch can still be damaged by poor folding and compression.
The strongest purchasing position is a balanced one. Demand enough technical detail to protect the order, but do not over-specify in ways that create new problems. More stitches, thicker backing, stronger adhesive, and tighter tolerances are not automatically better. The right specification is the one that holds up in wear, looks consistent in bulk, fits the jacket construction, and meets the customer’s commercial expectation.
Get a free quote from Fabrikn — your trusted B2B clothing manufacturer with 10+ years of experience. MOQ as low as 200 pieces.
Get a Free Quote →Single-needle lockstitch perimeter sewing is often the most practical option for many bulk jacket orders. It gives a clean appearance and reliable control. Zigzag, double stitching, or bar tacks may be better for certain patch shapes, fabrics, or high-stress uses, but they should be approved on an actual sample.
Yes, but they need careful testing. Coated nylon, softshell, laminated fabrics, and water-repellent finishes may not bond well or may be damaged by heat. For distributor bulk orders, adhesive plus stitching is usually safer than adhesive alone unless bonding performance has been validated.
Stock jacket decoration may start around 100 to 300 pieces, while custom jacket programs often fall around 300 to 1,500 pieces or more depending on fabric, patch complexity, and size range. MOQ is supplier-specific and may be driven by jacket fabric, patch production, labels, or decoration setup.
Buyers should review a pre-production sample using actual jacket fabric and final patch construction. Practical checks include visual inspection, moderate edge pull, panel flexing, wash testing where relevant, and review for puckering or fabric damage. Higher-risk programs may justify formal lab or third-party testing.
Flat chest placement is usually easier to control than sleeve, shoulder, or padded panel placement. Sleeves and shoulders face more curvature and movement, so they carry higher risk of edge lift, puckering, or placement variation. Large back patches can work well if the panel is stable and the patch is not too stiff.
Common failures include edge lifting, skipped stitches, loose thread, misalignment, puckering, needle damage, heat marks, adhesive residue, color mismatch, and lining caught in the seam. These should be listed clearly in the inspection checklist before production starts.
Embroidered patches are useful for dimensional branding, uniform looks, and designs that benefit from a separate badge. Direct embroidery may be cleaner for small logos but can damage thin shells or waterproof layers. The better choice depends on jacket fabric, logo detail, end use, and customer expectations.
Use simpler patch shapes, tonal sewing thread, flat placement areas, proven jacket fabrics, and standard attachment methods. Avoid untested heat seal, oversized sleeve patches, and complex dense embroidery when the schedule does not allow proper sampling and wash review.