Custom Print Testing for Apparel Samples compared by sample evidence, fabric or trim specs, MOQ, AQL terms, cost lines, delivery timing, and rework...
Fast answer: Custom Print Testing for Apparel Samples: Tech Pack, Sample Gate, MOQ, and QC Terms should be judged by production evidence, not by a generic sourcing promise. The buyer needs sample proof, cost breakdowns, QC checkpoints, and delivery buffers in writing.
Ask for recent sample photos, measurement tolerances, fabric or print test assumptions, decoration test notes, packing examples, and a named inspection checkpoint. These details show whether the team can repeat an approved sample at bulk volume.
Separate garment cost, decoration, labels, packaging, sampling, testing, freight, and rush charges. Clear cost lines make it easier to reduce colorways, adjust size depth, or reserve more time for sampling.
Custom print testing for apparel samples is the process of evaluating a print design on a physical garment before moving into full production. For brands, retailers, startups, and private label companies, this step is one of the most important quality control measures in the custom clothing development process. It helps confirm whether your artwork, print technique, fabric choice, and color expectations will translate into a commercially ready product.
In the apparel industry, a digital mockup is never enough. A design may look flawless on screen, but once it is printed onto 180-220 GSM cotton jersey, 280-320 GSM fleece, 100% polyester interlock, or 95/5 cotton-spandex blends, the result can change dramatically. Ink absorption, heat sensitivity, garment stretch, fabric texture, and finishing methods all influence the final look and feel. That is why custom print testing is essential before production begins.
For businesses sourcing apparel through a manufacturer like Fabrikn, testing samples gives you confidence that the final bulk order will meet your brand standards. It reduces the risk of costly reprints, customer complaints, and production delays. In many sourcing hubs, a typical sample development quote may range from $25-$75 per print sample depending on complexity, with bulk production often landing around $2.50-$4.00 per unit at 500 MOQ and lead times of 18-22 business days after sample approval. If you want to learn more about how a full-service partner supports this process, visit our services page.
Testing prints on apparel samples is more than a precaution. It is a practical investment in product quality, brand reputation, and cost efficiency. When you approve a print after reviewing a sample, you are making a decision based on actual garment performance rather than assumptions.
Here are the main reasons custom print testing matters:
For emerging apparel brands, this process also supports brand consistency. Your logo, slogan, artwork, and packaging all need to align with a clear visual standard. A tested sample ensures the final garment reflects that standard accurately.
Different print methods produce different results, and each has strengths depending on the garment type, design complexity, and intended use. During custom print testing, it is important to know which print method is being used so you can evaluate the sample properly.
Screen printing is one of the most popular methods for custom apparel because it produces vibrant, long-lasting prints. It is often used for bulk orders, logos, and bold graphics. Sample testing should focus on ink thickness, opacity, edge sharpness, and how well the print holds up on textured or stretch fabrics. In production, a manual carousel press or automatic MHM/ROQ-style press may be used with 110-156 mesh screens, plastisol inks, or water-based inks depending on the desired hand feel.
DTG is ideal for detailed artwork, photographic images, and small-run orders. Since the ink is absorbed into the fibers, sample evaluation should include color brightness, softness to the touch, and wash performance. DTG tends to work best on high-cotton garments and usually requires pretreatment, heat pressing, and curing through a conveyor dryer or heat tunnel for consistent results.
Heat transfer techniques involve applying the design using heat and pressure. This method can work well for logos, names, and high-detail graphics. When testing samples, look closely at adhesion, flexibility, and whether the transferred area feels too heavy or stiff. Common transfer options include PU vinyl, DTF transfers, and silicone heat transfers, each requiring accurate time, temperature, and pressure settings on a heat press.
Sublimation is a common choice for polyester garments and activewear. The ink becomes part of the fabric rather than sitting on top of it. When testing sublimation samples, evaluate color vibrancy, consistency, and how well the print performs under stretch and moisture exposure. It is typically applied to white or light-colored 100% polyester using paper transfer and a calender press or flat heat press.
Vinyl is often used for lettering, numbers, and simple shapes. Sample testing should assess smoothness, edge lifting, and durability after stretching and washing. It is especially important for sportswear and promotional garments, where cutter settings and weeding quality can affect the final edge finish.
When evaluating apparel samples, you should follow a structured checklist. This ensures nothing important is missed and gives your team a reliable way to compare samples across different styles or print methods.
Check the printed color against your approved artwork, Pantone references, or brand guidelines. Consider both the color in natural light and under indoor lighting, since appearance may change depending on the environment. For strict color-critical projects, many brands request a Delta E tolerance target and approve strike-offs before bulk cutting.
Measure the location of the print carefully. A centered logo that appears correct on a digital proof may look too high, too low, or off-balance on the real garment. Placement matters on t-shirts, hoodies, polo shirts, sweatshirts, and other apparel styles.
Assess whether the artwork is scaled appropriately for the garment size. A small logo may disappear visually on oversized apparel, while a large graphic may overwhelm a fitted shirt.
Examine the edges, lines, and fine details of the print. Blurred text, pixelation, or broken lines often indicate a technical issue that should be corrected before production. Fine-line screen prints generally perform better when artwork is simplified to at least 1.5-2 pt line weight equivalent.
The print should not make the garment uncomfortable to wear unless the intended design specifically requires a heavier finish. The print texture should match the product’s intended use, whether fashion, retail, uniform, or promotional apparel.
Test how the print behaves when the garment is stretched. This is crucial for fitted clothing, sportswear, ribbed fabrics, and garments with elastane or spandex. A good print should remain intact without cracking or distorting excessively.
Washing tests help determine how the print will perform over time. Look for fading, peeling, shrinking, bleeding, or image breakdown after repeated laundering.
Some prints react poorly to heat from pressing equipment, dryers, or ironing. Sample testing should include heat exposure when relevant to the garment’s expected care instructions.
A print may look excellent on one fabric and poor on another. Confirm that the print method is suitable for the exact fabric composition being used in production. For example, a 100% combed cotton tee, a 60/40 cotton-poly fleece hoodie, and a recycled polyester running top will all require different ink and curing strategies.
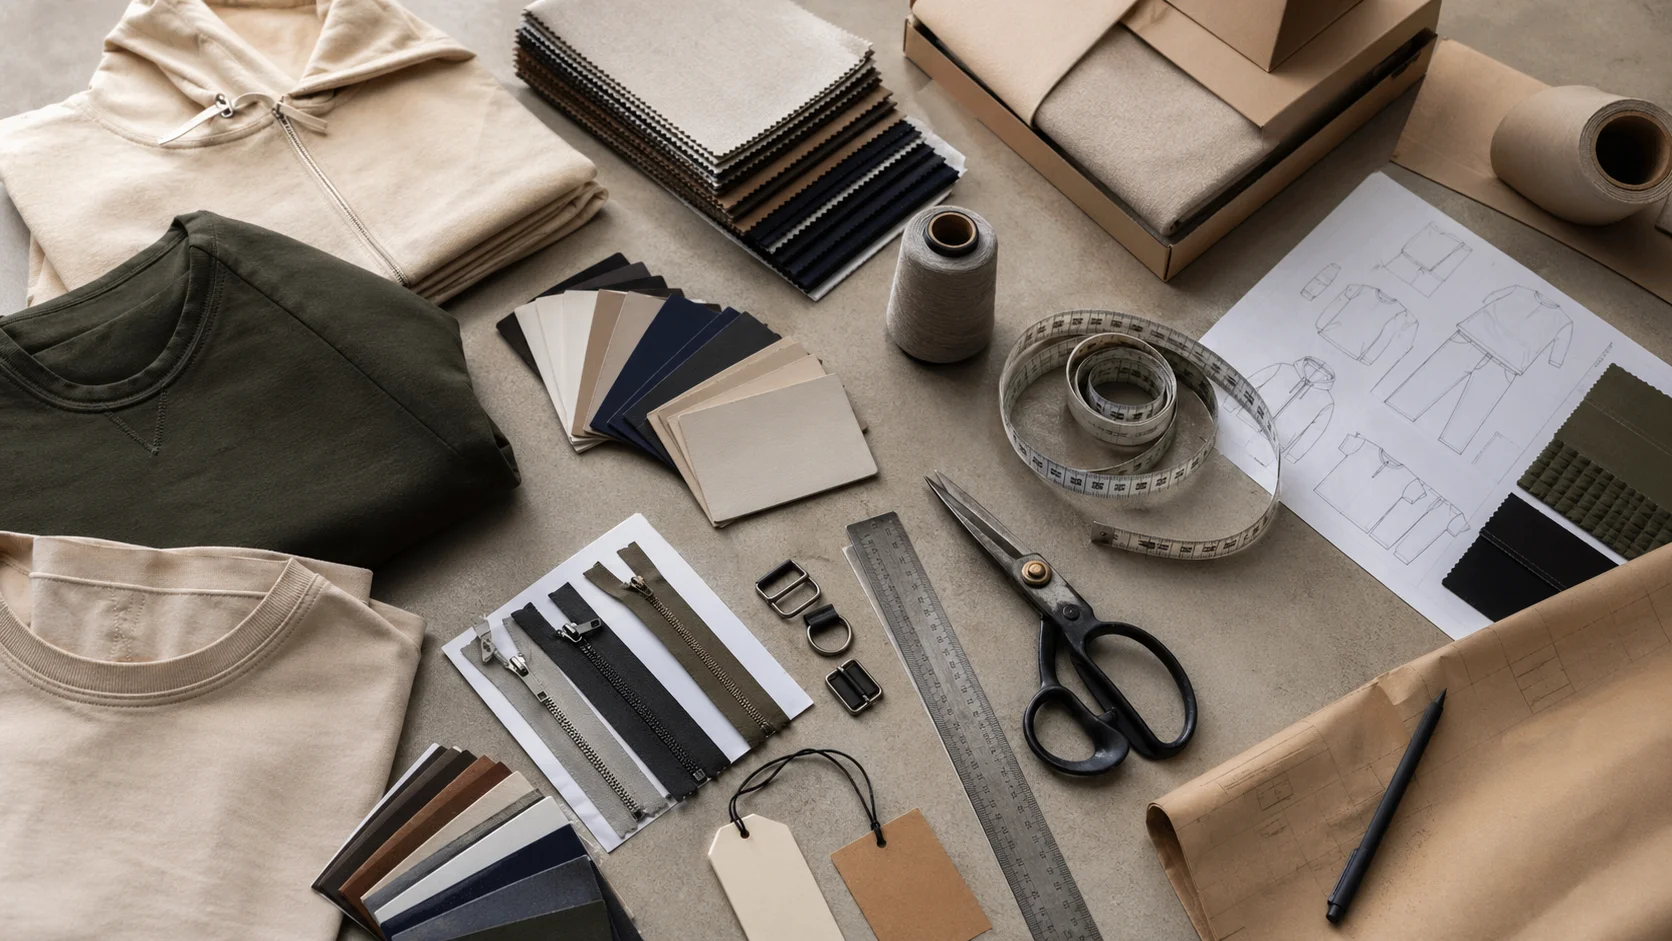
A successful print test begins with clear specifications. Before any sample is produced, provide your manufacturer with final artwork, print size, placement instructions, fabric details, and brand color references. The more precise your brief, the more accurate the sample will be.
Follow these steps for an effective custom print testing process:
For factories in Guangzhou, Dhaka, Ho Chi Minh City, or Istanbul, sample turnaround can vary depending on whether the print is one-color screen print, multi-color discharge print, DTG, or a mixed technique with embroidery and heat transfers. Many established suppliers with GOTS, OEKO-TEX Standard 100, WRAP, BSCI, or GRS certifications will also provide test reports, shade bands, and wash-test records as part of the approval package.
Print outcomes are heavily influenced by the material and construction of the garment. Cotton, polyester, viscose, modal, nylon, and elastane blends each respond differently to ink, heat, and pressure.
Key factors to consider include:
For example, a 95/5 cotton-spandex jersey tee may require a softer ink system and lower cure temperature than a 100% cotton open-end tee. Likewise, a recycled polyester sports shirt made with flatlock seams will perform better with sublimation than with heavy vinyl graphics. Manufacturers that cut and sew on automated Gerber or Lectra systems can also improve consistency by keeping panel dimensions tighter before printing.
Even experienced brands can make mistakes during sample review. Avoid these common issues to save time and money.
It is also a mistake to assume that low-cost sourcing always equals low quality. In some production centers, a basic sample may cost $15-$30 in smaller workshops, while a more controlled, certified factory may charge $35-$80 but offer better consistency, QC, and compliance documentation.
A formal approval process helps prevent disputes and keeps production aligned with the sample you approved. It should define exactly what must be checked before bulk manufacturing begins.
A strong approval workflow typically includes:
Many brands also request a pre-production meeting with the factory’s merchandising, printing, and quality teams. This is especially useful when sourcing from large manufacturing hubs such as Guangzhou for screen printing and trims, Dhaka for knitwear and cut-and-sew basics, Ho Chi Minh City for activewear and export programs, or Istanbul for premium fashion and fast-replenishment production.
Choosing the right manufacturer can make a significant difference in the quality of your print testing process. A good partner should understand both garment construction and printing mechanics, and should be willing to revise samples until the result matches your expectations.
When evaluating a factory, ask about:
Factories with modern equipment—such as automatic screen printers, Epson or Kornit DTG machines, Ricoh heads, hot-melt powder DTF systems, conveyor dryers, and computerized heat presses—can often deliver more consistent results. They also tend to manage repeat orders more reliably, especially for brands that need matching shade lots and exact reorders.
At Fabrikn, we support sample development, fit refinement, printing trials, and production planning so that your approved sample is translated into a stable bulk order. If you are scaling a line from 300 units to 3,000 units, consistent communication with the manufacturer is the key to keeping print quality, delivery timing, and cost under control.
Use these adjacent sourcing guides to compare supplier capability, costing, and production planning before you brief a factory.
For production planning, review Fabrikn services or contact the team through the sourcing brief form.
Q: What is the purpose of custom print testing on apparel samples?A: It verifies how a print looks and performs on real fabric before bulk production begins.
Q: How many samples should I test?A: At minimum, test one sample in the primary colorway and fabric. For complex programs, test multiple garment sizes and colorways.
Q: How long does sample print testing usually take?A: In many factories, the process takes 7-14 days for sampling and 18-22 business days for a fuller production-ready cycle after approvals, depending on complexity and material availability.
Q: What certifications should I look for in a print manufacturer?A: Common certifications include GOTS for organic textiles, OEKO-TEX Standard 100 for harmful substance testing, WRAP and BSCI for social compliance, and GRS for recycled content verification.
Q: What fabrics are best for print testing?A: The best fabric depends on the method. Cotton is strong for DTG and screen printing, polyester is best for sublimation, and blends should be tested carefully to confirm ink adhesion and stretch recovery.